Java
![]()
![]()
Looking for project ideas to build your Java skills? This page is filled with exciting and challenging projects that you can tackle using the Grader Than Workspace. Whether you're a beginner or an experienced developer, these projects cover a range of topics that will help you hone your Java skills and build powerful applications. Check out these project ideas today and take your Java development to the next level!
Spring Boot
Java Spring Boot is an open-source framework for building web applications using the Java programming language. It is built on top of the Spring framework and provides a streamlined approach to building and deploying web applications. Spring Boot simplifies the process of configuring and deploying Spring-based applications by providing a set of pre-configured templates and tools for quickly setting up and running applications. It includes features such as embedded servers, auto-configuration, and starter dependencies that make it easy to get started with Spring development. Spring Boot also provides a wide range of extensions and plugins for integrating with various libraries and frameworks, making it a popular choice for developers looking to build web applications quickly and efficiently.
What will we learn?
This is a step-by-step guide for building a simple note-taking application using Java Spring framework. The tutorial covers two different implementations, one that saves notes to a database using Spring Data JPA, and another that saves notes to a local file. The tutorial covers the following topics:
- Setting up a Spring Boot project
- Defining a Note model with required fields
- Creating a repository or service to handle CRUD operations
- Implementing a controller to handle HTTP requests
- Creating templates using Thymeleaf to render HTML
- Running and testing the application
This tutorial is suitable for beginners who are looking to learn Java Spring framework and want to build a simple application as a starting point. By following the tutorial, users will gain a good understanding of the core concepts of Spring, including dependency injection, inversion of control, and MVC pattern, as well as learn how to create a basic web application with Spring.
Step 1: Create a Spring Boot Project
-
Open the command pallet in your Grader Than IDE by pressing the keys below at the same time:
Ctrl+Shift+P
Cmd+Shift+P
-
Type
Java: Create Java project -
In the next step select Spring Boot as your project type.
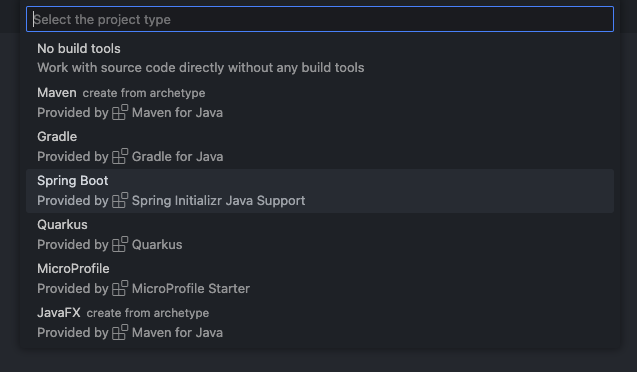
This is the Grader Than IDE Java project selection menu. -
In the next step select
Gradleas your project type.After selecting the project type you may press Enter repeatably to select all the subsequent default options. This will bypass the following steps 5 - 11.
What is Gradle?
Gradle is an open-source build automation tool that is used to automate the building, testing, and deployment of software projects. It is designed to be highly flexible and customizable, allowing developers to define complex build processes with ease.
Gradle is based on the concept of a build script, which is written in Groovy or Kotlin and describes the build process for a project. Build scripts are divided into tasks, which are units of work that can be executed independently or as part of a larger build process.
Gradle comes with a powerful plugin system that allows developers to easily integrate with popular software development tools such as Java, Android, and Spring Boot. It also includes a robust dependency management system that makes it easy to manage and resolve dependencies for a project.
Gradle is often compared to other build tools such as Maven and Ant. While it shares some similarities with these tools, Gradle is designed to be more flexible and customizable, making it a popular choice for complex software projects.
-
When prompted to select the Spring Boot version choose the latest version. At the time of writing this tutorial 3.0.4 was used.
-
Select Java as your project language
-
Optional change the group ID. This will set the package name of your application. For this tutorial we'll keep this as
com.exampleWhat is group ID?
In Maven, a project group ID is a unique identifier for a project that helps to distinguish it from other projects. It is typically a string that is based on the reverse domain name notation of the organization or individual that is responsible for the project.
For example, if the project is being developed by Grader Than and the project is named WebApp, the group ID might be "com.graderthan.webapp". This ensures that the project is uniquely identified and can be easily distinguished from other projects.
The group ID is defined in the Maven project's POM file (pom.xml) and is used by Maven to manage dependencies, build the project, and publish artifacts to repositories. By following a consistent naming convention for project group IDs, developers can make it easier to manage dependencies and ensure that their projects are easily recognizable and discoverable by other developers.
-
Optional change the Artifact ID. For this tutorial we'll keep this as
demoWhat is a artifact ID?
In Maven, a project artifact ID is a unique identifier for a specific artifact produced by a project. It is typically a string that describes the purpose or function of the artifact and helps to distinguish it from other artifacts that may be produced by the same project.
For example, if a project produces a library that provides utility functions for working with strings, the artifact ID might be "string-utils". This ensures that the artifact is uniquely identified and can be easily distinguished from other artifacts produced by the same project.
The artifact ID is defined in the Maven project's POM file (pom.xml) and is used by Maven to manage dependencies, build the project, and publish artifacts to repositories. By following a consistent naming convention for artifact IDs, developers can make it easier to manage dependencies and ensure that their artifacts are easily recognizable and discoverable by other developers.
-
Select
Jaras the packaging type. -
Select Java 17 as the Java version
-
When choosing the dependencies select the option "Selected 0 dependencies".
- Save the project in a directory withing
/home/developer/. For this tutorial we've chosen to save the project in/home/developer/Documents/code/demo
Step 2: Open the Spring Boot Project
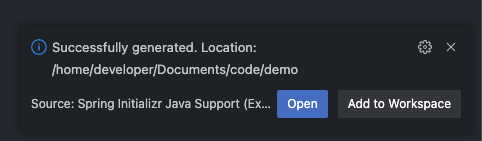
You should now see the newly created project in your file explorer menu on the right side of the screen. Additionally, a popup should appear at the bottom of the screen notifying you that the project has just been created.
Click the "open" button in the notification or change your IDE's workspace to project.
Step 3: Set up the Dependencies
Open the build.gradle file located in your project's root directory and add the following lines of code to the
dependencies block near line 15.
    dependencies {
        ...
        implementation 'org.springframework.data:spring-data-rest-webmvc'
        implementation 'org.springframework.boot:spring-boot-starter-web'
        implementation 'org.springframework.boot:spring-boot-starter-thymeleaf'
        developmentOnly 'org.springframework.boot:spring-boot-devtools'
    }
Make sure to place these dependencies under the existing dependencies in the dependencies block in your build.gradle
file.
Once you've added these dependencies, open your terminal and run gradle build to download and install the
dependencies into your project.
Step 4: Define the Data Model
Next, create a note class in the com.example.demo package (1). We will use this class to define a model for your
notes.
- The file should be named
Note.java. The file should be created in the directorysrc/main/java/com/example/demo.
In this example, we'll create a Note class with the following fields:
-
id (long)
-
title (String)
-
content (String)
-
created (Date)
-
updated (Date)
Note.java
package com.example.demo;

import java.util.Date;
import java.util.Objects;

public class Note {
    private int id;
    private String title;
    private String content;
    private Date created;
    private Date updated;

    public Note() {
        // empty constructor required by JPA
    }

    public Note(String title, String content) {
        this.title = title;
        this.content = content;
        this.created = new Date();
        this.updated = new Date();
    }

    public int getId() {
        return id;
    }

    public void setId(int id) {
        this.id = id;
    }

    public String getTitle() {
        return title;
    }

    public void setTitle(String title) {
        this.title = title;
    }

    public String getContent() {
        return content;
    }

    public void setContent(String content) {
        this.content = content;
    }

    public Date getCreated() {
        return created;
    }

    public void setCreated(Date created) {
        this.created = created;
    }

    public Date getUpdated() {

        if(Objects.isNull(this.updated)){
            return this.created;
        }

        return updated;
    }

    public void setUpdated(Date updated) {
        this.updated = updated;
    }
}
Step 5: Create a Service
Now, create a service to handle note-related operations. This service will be responsible for reading and writing notes
to a local file. Create a new class called NoteService in the com.example.demo package (1) with the following code:
- The file should be named
NoteService.java. The file should be created in the directorysrc/main/java/com/example/demo.
NoteService.java
package com.example.demo;

import java.io.BufferedReader;
import java.io.BufferedWriter;
import java.io.File;
import java.io.FileReader;
import java.io.FileWriter;
import java.io.IOException;
import java.util.ArrayList;
import java.util.Date;
import java.util.List;

import org.springframework.data.rest.webmvc.ResourceNotFoundException;
import org.springframework.stereotype.Service;
/**
* A service class for managing notes.
*/
@Service
public class NoteService {
    /**
    * The name of the file used to store notes.
    */
    private static final String FILENAME = "notes.txt";

    /**
    * Constructs a Note Service object and create the notes.txt file if it doesn't exist.
    */
    public NoteService() {
        File file = new File(FILENAME);
        if (!file.exists()) {
            try {
                file.createNewFile();
            } catch (IOException e) {
                throw new RuntimeException("Failed to create notes file: " + e.getMessage());
            }
        }
    }

    /**
    * Returns a list of all notes.
    *
    * @return a list of Note objects
    */
    public List<Note> getAllNotes() {
        List<Note> notes = new ArrayList<>();
        try (BufferedReader reader = new BufferedReader(new FileReader(FILENAME))) {
            String line;
            while ((line = reader.readLine()) != null) {
                String[] parts = line.split("\\|");
                Note note = new Note();
                note.setId(Integer.parseInt(parts[0]));
                note.setTitle(parts[1]);
                note.setContent(parts[2]);
                note.setCreated(new Date(Long.parseLong(parts[3])));
                note.setUpdated(new Date(Long.parseLong(parts[4])));
                notes.add(note);
            }
        } catch (IOException e) {
            e.printStackTrace();
        }
        return notes;
    }

    /**
    * Returns a note with the specified ID.
    *
    * @param id the ID of the note to retrieve
    * @return the Note object with the specified ID
    * @throws ResourceNotFoundException if no note with the specified ID exists
    */
    public Note getNoteById(List<Note> notes, int id) {
        return notes.stream()
                .filter(note -> note.getId() == id)
                .findFirst()
                .orElseThrow(() -> new ResourceNotFoundException(String.format("The Note with ID: %s was not found", id)));
    }

    /**
    * Saves a note to the file. If the note has an ID of 0, a new ID will be assigned.
    *
    * @param note the Note object to save
    */
    public void saveNote(Note note) {
        List<Note> notes = getAllNotes();

        if (note.getId() == 0) {
            note.setId(notes.size()+1);
            note.setCreated(new Date());
            notes.add(note);
        } else {
            Note existingNote = getNoteById(notes, note.getId());
            existingNote.setTitle(note.getTitle());
            existingNote.setContent(note.getContent());
            existingNote.setUpdated(new Date());
        }

        try (BufferedWriter writer = new BufferedWriter(new FileWriter(FILENAME))) {
            for (Note n : notes) {
                writer.write(n.getId() + "|" + n.getTitle() + "|" + n.getContent() + "|" + n.getCreated().getTime() + "|" + n.getUpdated().getTime() + "\n");
            }
        } catch (IOException e) {
            e.printStackTrace();
        }
    }

    /**
    * Deletes a note with the specified ID.
    *
    * @param id the ID of the note to delete
    */
    public void deleteNoteById(int id) {
        List<Note> notes = getAllNotes();
        Note note = getNoteById(notes, id);
        notes.remove(note);
        try (BufferedWriter writer = new BufferedWriter(new FileWriter(FILENAME))) {
            for (Note n : notes) {
                writer.write(n.getId() + "|" + n.getTitle() + "|" + n.getContent() + "|" + n.getCreated().getTime() + "|" + n.getUpdated().getTime() + "\n");
            }
        } catch (IOException e) {
            e.printStackTrace();
        }
    }
}
Note that we're using a local file (notes.txt) to store notes. In getAllNotes(), we're reading notes from the file and
creating Note objects from each line. In saveNote(), we're adding or updating notes in the list, then writing the
updated list back to the file. In deleteNoteById(), we're removing the specified note from the list and writing the
updated list back to the file.
Step 6: Create a Controller
Next, create a controller to handle HTTP requests. Create a new class called NoteController in the com.example.demo
package (1) and annotate it with @Controller:
- The file should be named
NoteController.java. The file should be created in the directorysrc/main/java/com/example/demo.
NoteController.java
package com.example.demo;

import java.util.List;

import org.springframework.beans.factory.annotation.Autowired;
import org.springframework.stereotype.Controller;
import org.springframework.ui.Model;
import org.springframework.web.bind.annotation.GetMapping;
import org.springframework.web.bind.annotation.ModelAttribute;
import org.springframework.web.bind.annotation.PathVariable;
import org.springframework.web.bind.annotation.PostMapping;

/**
* A controller for handling HTTP requests related to notes.
*/
@Controller
public class NoteController {
    /**
    * The NoteService used to handle note-related operations.
    */
    @Autowired
    private NoteService noteService;

    /**
    * Displays a list of all notes.
    *
    * @param model the Model object to use for rendering the view
    * @return the name of the view to render
    */
    @GetMapping("/")
    public String getAllNotes(Model model) {
        List<Note> notes = noteService.getAllNotes();
        model.addAttribute("notes", notes);
        return "notes";
    }

    /**
    * Displays a single note with the specified ID.
    *
    * @param id the ID of the note to display
    * @param model the Model object to use for rendering the view
    * @return the name of the view to render
    * @throws ResourceNotFoundException if no note with the specified ID exists
    */
    @GetMapping("/notes/{id}")
    public String getNoteById(@PathVariable int id, Model model) {
        List<Note> notes = noteService.getAllNotes();
        Note note = noteService.getNoteById(notes, id);
        model.addAttribute("note", note);
        return "note";
    }

    /**
    * Displays a form for creating a new note.
    *
    * @param model the Model object to use for rendering the view
    * @return the name of the view to render
    */
    @GetMapping("/notes/new")
    public String createNoteForm(Model model) {
        model.addAttribute("note", new Note());
        return "note-form";
    }

    /**
    * Handles a submission of a new or updated note.
    *
    * @param note the Note object to save
    * @return a redirect to the home page
    */
    @PostMapping("/notes")
    public String createNoteSubmit(@ModelAttribute Note note) {
        noteService.saveNote(note);
        return "redirect:/";
    }

    /**
    * Displays a form for editing a note with the specified ID.
    *
    * @param id the ID of the note to edit
    * @param model the Model object to use for rendering the view
    * @return the name of the view to render
    * @throws ResourceNotFoundException if no note with the specified ID exists
    */
    @GetMapping("/notes/{id}/edit")
    public String updateNoteForm(@PathVariable int id, Model model) {
        List<Note> notes = noteService.getAllNotes();
        Note note = noteService.getNoteById(notes, id);
        model.addAttribute("note", note);
        return "note-form";
    }

    /**
    * Handles a submission of an updated note.
    *
    * @param id the ID of the note to update
    * @param note the Note object with updated information
    * @return a redirect to the updated note's page
    */
    @PostMapping("/notes/{id}")
    public String updateNoteSubmit(@PathVariable int id, @ModelAttribute Note note) {
        note.setId(id);
        noteService.saveNote(note);
        return "redirect:/notes/" + id;
    }

    /**
    * Deletes the note with the specified ID.
    *
    * @param id the ID of the note to delete
    * @return a redirect to the home page
    */
    @PostMapping("/notes/{id}/delete")
    public String deleteNoteById(@PathVariable int id) {
        noteService.deleteNoteById(id);
        return "redirect:/";
    }
}
Step 7: Create the Templates Directory
Next, let's create the necessary directories to hold our HTML files. Create the src/main/resources/templates/ directory and
the src/main/resources/templates/fragments/ directory. The src/main/resources directory should look like the file tree below:
Step 8: Create the Templates
Now we'll create the HTML templates that will display the web app's GUI in the user's browser. Create the following
templates in the src/main/resources/templates/fragments/ directory:
The following two HTML files are fragments that contain small sections of HTML code we will use in our actual HTML pages. These fragments include the scripts required for us to access Bootstrap.
What is Bootstrap?
Bootstrap is a popular front-end framework that is used to design and develop responsive, mobile-first web applications. It is an open-source project developed by Twitter and is based on HTML, CSS, and JavaScript.
Bootstrap provides a set of CSS classes and JavaScript plugins that can be used to quickly and easily create responsive, mobile-friendly user interfaces. It includes a wide range of UI components such as buttons, forms, navigation menus, modals, and much more. These components can be customized using CSS variables, and can be extended with custom styles and JavaScript.
Bootstrap also comes with a robust grid system that allows developers to create flexible and responsive layouts for their web pages. This grid system is based on a 12-column layout and can be easily customized to fit different screen sizes and resolutions.
Overall, Bootstrap is a powerful and flexible front-end framework that makes it easy for developers to create modern, responsive web applications that work across a wide range of devices and platforms.
bootstrap-head.html
src/main/resources/templates/fragments/bootstrap-head.html
<!DOCTYPE html>
<html xmlns:th="http://www.thymeleaf.org">
    <head th:fragment="bootstrap-head">
        <meta charset="utf-8">
        <meta name="viewport" content="width=device-width, initial-scale=1, shrink-to-fit=no">

        <!-- Bootstrap CSS -->
        <link rel="stylesheet"
        href="https://cdn.jsdelivr.net/npm/bootstrap@4.3.1/dist/css/bootstrap.min.css"
        integrity="sha384-ggOyR0iXCbMQv3Xipma34MD+dH/1fQ784/j6cY/iJTQUOhcWr7x9JvoRxT2MZw1T"
        crossorigin="anonymous">
    </head>
</html>
bootstrap-js.html
src/main/resources/templates/fragments/bootstrap-js.html
<!DOCTYPE html>
<html xmlns:th="http://www.thymeleaf.org">
    <div th:fragment="bootstrap-js">
        <!-- Optional JavaScript -->
        <!-- jQuery first, then Popper.js, then Bootstrap JS -->
        <script src="https://code.jquery.com/jquery-3.3.1.slim.min.js" integrity="sha384-q8i/X+965DzO0rT7abK41JStQIAqVgRVzpbzo5smXKp4YfRvH+8abtTE1Pi6jizo" crossorigin="anonymous"></script>
        <script src="https://cdn.jsdelivr.net/npm/popper.js@1.14.7/dist/umd/popper.min.js" integrity="sha384-UO2eT0CpHqdSJQ6hJty5KVphtPhzWj9WO1clHTMGa3JDZwrnQq4sF86dIHNDz0W1" crossorigin="anonymous"></script>
        <script src="https://cdn.jsdelivr.net/npm/bootstrap@4.3.1/dist/js/bootstrap.min.js" integrity="sha384-JjSmVgyd0p3pXB1rRibZUAYoIIy6OrQ6VrjIEaFf/nJGzIxFDsf4x0xIM+B07jRM" crossorigin="anonymous"></script>
    </div>
</html>
Note that we're using Thymeleaf templates to render the HTML. We have a notes.htmltemplate to display all notes, a
note.html template to display a single note, and a note-form.html template to handle note creation and editing. We
will create the templates in the next step.
What are Thymeleaf templates?
Thymeleaf templates are Java-based server-side templates that allow developers to generate dynamic HTML, XML, and other text-based formats. They include special attributes to add dynamic content and logic and are easy to read, maintain, and customize. Thymeleaf templates are commonly used for generating complete web pages, email templates, and PDF documents in Java web applications.
Create the following Thymeleaf templates in the src/main/resources/templates/ directory:
notes.html
src/main/resources/templates/notes.html
<!DOCTYPE html>
<html xmlns:th="http://www.thymeleaf.org">
    <head>
        <title>Note Taking App</title>

        <!-- Include the bootstrap-head fragment -->
        <th:block th:replace="~{fragments/bootstrap-head :: bootstrap-head}"></th:block>
    </head>
    <body>
        <div class="container">
            <div class="row">
                <h1>My Notes</h1>
            </div>
            <div class="row p-2">
                <div class="col">
                    <a class="btn btn-primary btn-block" href="/notes/new">Add Note</a>
                </div>
            </div>
            <div class="row p-2" th:each="note : ${notes}">
                <div class="col">
                    <div class="card">
                        <div class="card-body">
                        <h5 class="card-title" th:text="${note.title}"></h5>
                        <p class="card-text">Updated: <span th:text="${note.updated}"></span></p>
                        <a class="btn btn-outline-primary btn-sm"
                        th:href="@{/notes/{id}(id=${note.id})}">Open</a>
                        </div>
                    </div>
                </div>
            </div>
        </div>

        <!-- Include the bootstrap-js fragment -->
        <th:block th:replace="~{fragments/bootstrap-js :: bootstrap-js}"></th:block>
    </body>
</html>
note.html
src/main/resources/templates/note.html
<!DOCTYPE html>
<html xmlns:th="http://www.thymeleaf.org">
    <head>
        <title>Note Taking App</title>

        <!-- Include the bootstrap-head fragment -->
        <th:block th:replace="~{fragments/bootstrap-head :: bootstrap-head}"></th:block>
    </head>
    <body>
        <div class="container">
            <div class="card mt-2">
                <div class="card-body">
                    <h1 class="card-title" th:text="${note.title}"></h1>

                    <p class="card-text" th:text="${note.content}"></p>

                    <p class="card-text">
                        <small class="text-muted">
                            Created: <span th:text="${note.created}"></span>
                            <br>
                            Updated: <span th:text="${note.updated}"></span>
                        </small>
                    </p>

                    <div class="row">
                        <div class="col-1 p-2">
                            <a class="btn btn-outline-secondary" href="/" th:text="Back"></a>
                        </div>
                        <div class="col-1 p-2">
                            <a class="btn btn-success" th:href="@{/notes/{id}/edit(id=${note.id})}" th:text="Edit"></a>
                        </div>
                        <div class="col-1 p-2">
                            <form th:action="@{/notes/{id}/delete(id=${note.id})}" method="post">
                                <button class="btn btn-danger" type="submit">Delete</button>
                            </form>
                        </div>
                    </div>
                </div>
            </div>
        </div>

        <!-- Include the bootstrap-js fragment -->
        <th:block th:replace="~{fragments/bootstrap-js :: bootstrap-js}"></th:block>
    </body>
</html>
note-form.html
src/main/resources/templates/note-form.html
<!DOCTYPE html>
<html xmlns:th="http://www.thymeleaf.org">
    <head>
        <title>Note Taking App</title>

        <!-- Include the bootstrap-head fragment -->
        <th:block th:replace="~{fragments/bootstrap-head :: bootstrap-head}"></th:block>
    </head>
    <body>
        <div class="container">
        <h1>Create or Edit Note</h1>
        <form th:object="${note}" th:action="@{/notes}" method="post">
            <div class="form-group">
                <input type="hidden" th:field="*{id}"/>
                <label for="title">Title:</label>
                <input class="form-control" type="text" id="title" th:field="*{title}"/>
            </div>

            <div class="form-group">
                <label for="content"> Content:</label>
                <textarea class="form-control" id="content" th:field="*{content}"></textarea>
            </div>

            <div class="row">
                <div class="col-1 p-2">
                    <button class="btn btn-primary" type="submit">Save</button>
                </div>
                <div class="col-1 p-2">
                    <!-- If the note id == 0 it hasn't been saved, so when the user clicks back we go to "notes" page instead of "note" page. -->
                    <a class="btn btn-outline-secondary" th:href="${note.id == 0} ? '/' : @{/notes/{id}(id=${note.id})}" th:text="Back"></a>
                </div>
            </div>
        </form>
    </div>

        <!-- Include the bootstrap-js fragment -->
        <th:block th:replace="~{fragments/bootstrap-js :: bootstrap-js}"></th:block>
    </body>
</html>
Step 8: Run the server
Open the terminal and run the following command:
Step 9: Connect to the Server
-
Open the command pallet in your Grader Than IDE by pressing the keys below at the same time:
Cmd+Shift+P
Ctrl+Shift+P
Ctrl+Shift+P
-
Now that the command pallet is open type
> simple browser showand press Enter -
Copy and paste your workspace's url into the text field that appears. Replace the text
ideat the beginning of the url with8080and replace the path aftergraderthan.comwith/.Example:
https://8080-{workspace-id}.workspace.graderthan.com/(1)- The
{workspace-id}is your workspace's unique identifier.
This will take you to the home page of your Spring note-taking application.
- The
-
Copy your workspace url.
-
Create a new browser tab.
-
Paste your workspace url into the new browser tab. Replace the text
ideat the beginning of the url with8080and replace the path aftergraderthan.comwith/.Example:
https://8080-{workspace-id}.workspace.graderthan.com/(1)- The
{workspace-id}is your workspace's unique identifier.
This will take you to the home page of your Spring note-taking application.
- The