Configure
The Workspace page is where you can modify your course's workspace configurations.
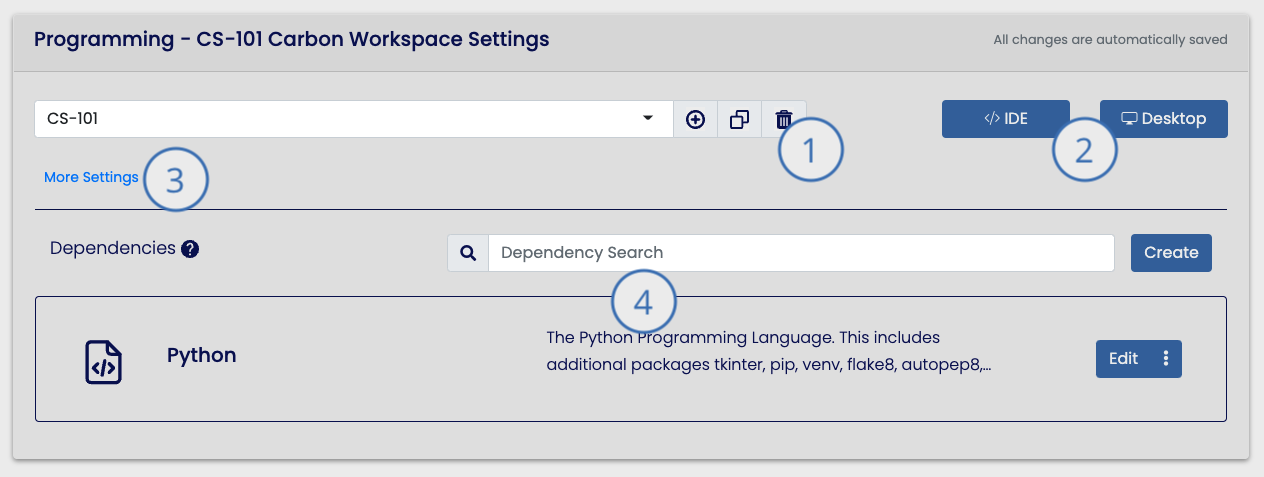
- Use this menu to change your Configurations.
- These buttons will open your workspace.
- This button will expose additional Workspace settings.
- This is where you can select dependencies, which are shell scripts that install software packages when the Workspace is started.
Open the Workspace Settings
- Open your course's Workspace Settings Page, open the Courses page by clicking the Courses

 button in the activity bar, on the left side of the screen.
 - On the Courses page, click the blue Open button that corresponds to the course you'd like to open.
- Now that the Courses page is open, in the bar at the top of the screen, click the tab labeled Workspace.
Change your Configuration
At the top of the Workspace Settings page, you may notice a menu known as the Configuration selection menu. This menu enables you to switch your course's workspace configuration, duplicate the existing configuration, or delete the configuration.

By selecting the drop-down menu labeled with your course's current configuration name, you will have the option to select another configuration.
Changing the course's Workspace configuration may negatively affect the student experience.
If you or your students have already accessed their Workspace, changing your workspace configuration may cause unexpected behaviors especially if the new configuration uses a new OS.
| Icon | Description |
|---|---|
| Creates a new Workspace Configuration. | |
| Duplicates the current Configuration. | |
| Deletes the current Configuration. Upon deletion, you and your students will be able to access the Workspace using the recently deleted configuration, until a new configuration is selected. |
General Settings
The general setting section will enable you to change the metadata of the configuration, as well as the operating system. The Configuration Name and Description fields identify your Workspace.
| Field | Description |
|---|---|
| Configuration Name | This is the name primarily used to identify the configuration in searches. |
| Description | This is to explain the configuration, so when you share it with your colleagues they may use it properly. |
| Operating System | This dropdown is used to change the Workspace's OS image. Each OS has several pre-configured images designed for computer related tasks. The pre-configured programming images come with several common language specific dependencies and all the necessary IDE extensions installed. OS Options may vary depending on your school's license agreement and administrator's settings. |
Changing the course's Workspace OS may negatively affect the student experience.
If you or your students have already accessed their Workspace, changing your Workspace's OS may cause several applications to no longer work properly.
Open General Settings
- Start out by opening the course's Workspace Settings.
- Below the Configuration selection menu at the top of the screen, click the button labeled More Settings.
Advanced Settings
In the Advanced Settings section, you can modify the hardware resources and access settings of the Workspace.
Hardware resources limitations may vary.
Depending on your school's license agreement and administrator's settings, you may have different resource limitation than your peers. For more details, please consult your system administrator.
Use a health amount of resources.
Remember your institution's resources are shared amongst all users. If your Workspace Configuration uses too many resources your course could consume all your institution's resources and block other students from using the system. The default hardware settings are sufficient for most introductory and intermediate programming courses. Please review our recommend hardware setting guidelines lines for more details.
| Field | Description |
|---|---|
| CPU Type | This is the name of the CPU architecture the Workspace will run on. |
| vCPU Count | This is the number of vCPU cores the Workspace will have access to. |
| RAM | Here you may set the amount of memory available to the Workspace. |
| vGPU | The number of vGPU cores the Workspace will have access to. |
Open Advanced Settings
- Start by opening the course's Workspace Settings.
- Next, open the general setting section.
- At the bottom of the General Settings section, click the button labeled Advanced Settings.
Recommended Hardware settings
Below are a few hardware configurations:
| Description | vCPU | RAM/GB | HD/GB | vGPU |
|---|---|---|---|---|
| General - A general-purpose Linux Workspace suitable for most introductory and mid-level programming courses. | 1 | 2 | 5 | Optional (Recommended for AI) |
| Android - A Linux Workspace suitable for android app development. | 2 | 16 | 50 | Not Likely |
| iOS - A Workspace preinstalled with macOS that is used for iOS development. | 4 | 16 | 50 | Not Likely |
| Windows - A general-purpose virtual desktop with Windows preinstalled. | 2 | 8 | 5 | Optional (Recommended for graphic design and CAD) |
| Mac - A general-purpose virtual desktop with macOS preinstalled. | 2 | 8 | 5 | Optional (Recommended for graphic design and CAD) |
Dependencies
A Dependency is a shell script that is run when the Workspace starts up. Often the scripts are used to install software packages on your students' Workspace each time it starts up. This is important because if a student breaks their Workspace, they only need to restart their Workspace in order to fix the problem. The system will self-heal the development environment by reinstalling the necessary dependencies, while also preserving their school work saved in their home directory.
You may create a custom Dependency or use a pre-built Dependency created by the Grader Than Community.
Create a Dependency
- Open the course's Workspace Settings.
- Scroll to the middle of the screen and locate the blue button labeled Create (on the opposite side of the Dependencies label).
- Click the Create button. This will open a window where you will be asked to select the Dependency name.
- Once you have specified a name for the new Dependency, the Dependency Editor window will display where you can set the Dependency's script and other settings. Read more about the Dependency settings below:
Open the Dependency Editor
- Open the course's Workspace Settings.
- In the section labeled Dependencies, find the Dependency you'd like to edit.
- Click the blue Edit button in the selected Dependency row.
General Settings
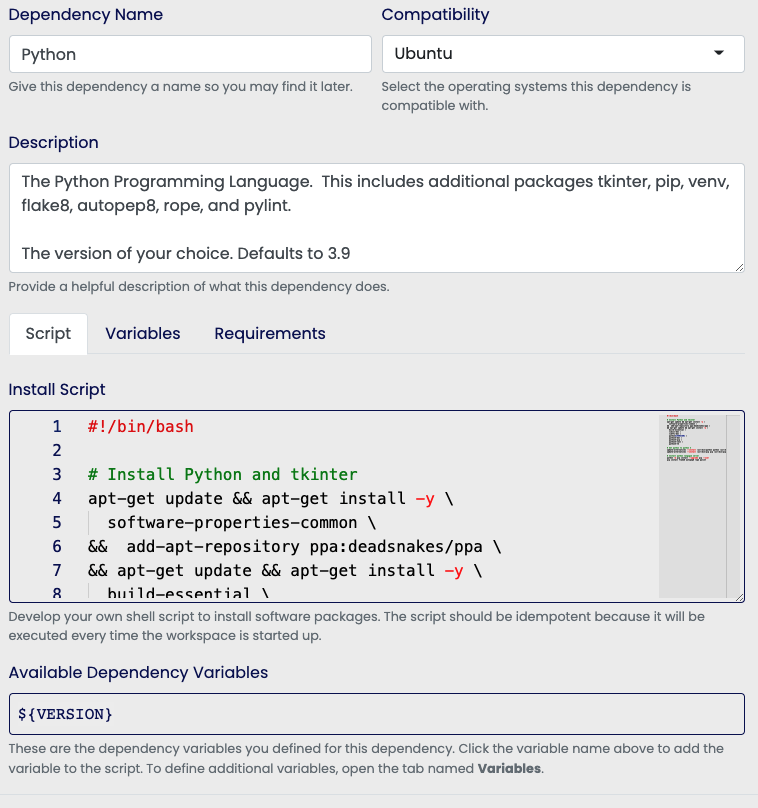
At the top section of the Dependency Editor window, you have the option to modify the dependency's metadata. This information is used to categorize the Dependency for quick retrieval when you and your colleagues search for it.
| Field | Description |
|---|---|
| Dependency Name | This is the general title of the Dependency |
| Compatibility | Select the OS's that are able to run the shell script. |
| Description | Provide a helpful description of what the Dependency does and how to use it. |
Script
Within this section you can define your own shell script. Bash is preinstalled in Linux and Mac instances. This script should be idempotent. In other words, it should be able to be run at every startup without having an issue of the change states from initial startup and subsequent starts.
If the script fails for whatever reason, then the Workspace will fail to start up.
When you share your Dependency with another person, they will be unable to modify the script, but they will be able to modify Variables. Learn more about Variables below.
Variables
Define dependency variables to increase the flexibility of your Dependency. In the example image of the Dependency Editor window above, we created a Dependency that installs Python, and we have added a VERSION variable, so user's of the Dependency are not locked into using any particular version.
Dependency variables are not environment variables.
Dependency variables scope and lifetime is limited to the dependency's script.
To create a Variable:
- Open the dependency editor
- In the middle of the Dependency Editor window click the tab labeled Variables
- If it's your Variable for the dependency, you will see a text field where you may define the Variable's title. If you already have a Variable, click the Create Variable button (to the right of the Select Variable menu) to reveal the creation menu.
| Field | Description |
|---|---|
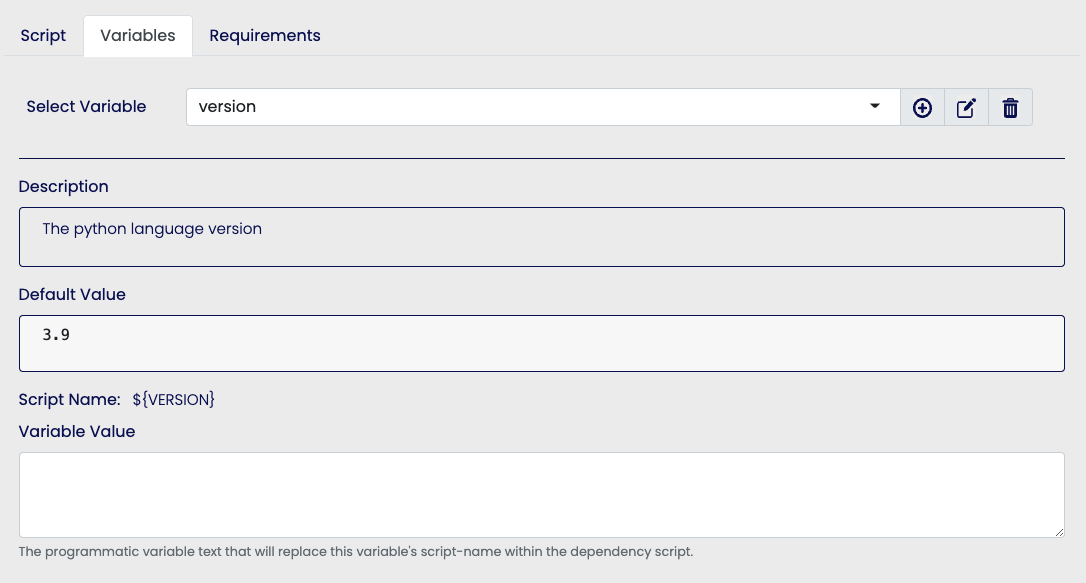
| Select Variable | Use this menu to select a variable, create a new variable, enable modification mode of the selected variable, and delete the selected variable. |
| Description | Explain what the variable does to another, so that the user may use the variable effectively. (This can only be modified the by owner of the Dependency) |
| Default Value | Specify a value to be used if the user does not define their own value. (This can only be modified the by owner of the Dependency) |
| Variable Value | This is the custom value to be used in the script. |
Requirements
In this section, you may select the Dependencies that this dependency(s) requires. For example, you may be installing and working on a web design, and you want to create a React.js dependency. The React dependency will dependent upon another npm. This way the npm package manager is installed, prior to running the React script which will use npm for its installation.